School of Science and Technology 科技學院
Electronic and Computer Engineering 電子工程學系

Development of a Mobile Application for Quantitative Analysis of Lip Images

Student Shen Siqi
Programme Bachelor of Science with Honours in Computer Engineering
Supervisor Dr. Kevin Hung
Year 2021/22

Abstract

With the widespread use of mobile computing and the growing emphasis on consumer-centric marketing, more consumers now rely on smart solutions for beauty and personal care. This is evidenced by the recent surge of the cosmetics industry and the popularity of makeup-shopping mobile apps. Despite the popularity and market growth, these mobile apps still lack customized services. The user experience would be greatly enhanced if the mobile apps could provide smart recommendation services based on the user's personal profile.

The aim of the project is to design and develop an Android-based mobile application for analyzing lip images. The app has the following functions:

  1. guiding users to take photos of lip images,
  2. storing and processing the lip images;
  3. quantitative analysis of lip features;
  4. virtual lipstick try-on.

The algorithms and software modules developed in this project will later be considered for integration into a smart lipstick recommendation system of a cosmetic company. With access to the recommendation system, cosmetic-shopping mobile apps will have the functions of augmented-reality (AR)-based lipstick try-on, personalized lipstick comparison, and customized product recommendation. This project collaborates with the School of Health Sciences and Sports, Macao Polytechnic Institute.

Demonstration Video

Objectives

Aims

The aim of the project is to provide a software solution for analyzing lip images, which will be used in a lipstick recommendation system. The results will provide insights into the technical feasibility of such a system to be jointly developed by Macao Polytechnic Institute in the future.

Objectives

The objective of the project is to design, develop and evaluate a mobile application for analyzing lip images. The mobile application will have the following features:

  1. Use of mobile device's camera to capture user's images;
  2. Identify the lip area in the captured lip images;
  3. Analyze lip volume based on the lip images;
  4. Analyze the lip color based on the lip images.

These functions will be useful for developing a smart lipstick recommendation system. Identifying the lip area and analyzing lip volume will help the system improve the accuracy of applying lipstick to the user's lip. Analyzing lip color based on the lip images for recommending the suitable lipstick color for the user.

Methodologies and Technologies used

System Design

To meet the requirement, there are several functions in the proposed system including virtual lipstick try-on, lipstick recommendation, brand lipstick selection, and lipstick comparison.  Also, there is an extra function called the lip detection point manual adjustment function.

Figure 1. Block diagram of the application.

Figure 1. shows a block diagram of the proposed mobile application. Users open our mobile app, the welcome page will show firstly and then switch to the onboarding interface. After that, users will enter the main interface. When users are ready for further action, just click the button set on the screen to enter the lipstick try-on page. Before switching to the try-on interface, the system will firstly ask for users to choose one way between selfie and album to submit the image. When users enter the lipstick try-on interface, Users can start their virtual makeup.

There are some functions including lipstick try-on function, lipstick comparison function, lip color detection function, brand selection function, and one extra function called lip detection point manual adjustment function. These functions will be discussed in detail below.

Lipstick Try-on Function

When users enter the lipstick try-on interface, the major function shown is the lipstick try-on. The photo selected by users will be shown on the screen and then there are some lipstick color choices displayed at the bottom. Once users select one lipstick color of them, the corresponding virtual lipstick makeup will be shown on the screen directly until the next color is chosen.

Brand Select Function

To provide users with a better experience, the application allows users to select lipstick from different brands and different series of brands. Users can see the try-on effect online. So there will be a button at the bottom of the lipstick try-on interface, if the button is pressed, the interface will switch to the brand selection interface, users can choose the brand and the series, and then back to the try-on interface to see the effect. Users can also use the search bar to find their brand and series.

Lipstick Comparison

When choosing the lipstick you like or the lipstick that suits you, there is always a comparison between different lipsticks. Sometimes there are too many lipstick options, and it takes a while to compare the options to find what is your favorite. Therefore, there is a function for those people who want to compare different lipsticks or the pictures before and after painting the lipstick. The function is achieved by setting some buttons on the lipstick try-on interface, users can choose 2 lipsticks to compare by the undo and redo buttons or just choose 1 lipstick to compare the image before the makeup and after the makeup by another button.

LipColor Detection

The LipColor detection function is the most important part of the subsequent recommendation system. The lip color detection function will provide the basic data to the recommendation system to analyze the user data and recommend personally. LipColor detection function will be done after the face detection, if the user's face can be detected successfully, the color detection will also run successfully. After the color detection, there is a dialog shown on the lipstick try-on screen to show the detected color first and then this color will be shown on the top right of the screen as a little widget with a shaking animation to grab the user’s attention.

Lip Detection Point Manual Adjustment Function

This is the extra function to improve the accuracy of lip detection. In case the system goes wrong such as it cannot detect the lip image correctly or users do not satisfy the apply area, there is a function for users to adjust the lip detection manually. This will improve the accuracy and flexibility of the application and prevent it from being unavailable due to system errors. In terms of design, there will be a button on the lipstick try-on interface, users will enter the edit page once they press the button. The control points will be shown and they are available to adjust. After they finish the edit, the system will detect the lip based on the user's adjustment.

After explaining the basic idea of different functions, there is a block diagram showing the data transmission between different functions (Figure 3.2), which can help figure out the relationships between the functions. In short, To achieve the lipstick try-on function, it needs the lipstick data from the brand selection function, image data from the main interface which calls the camera or gallery, and the lip area detection points from face detection. After implementing the lipstick try-on function, it will pass the bitmap list that has been applied lipstick to the lipstick comparison function. Also, the lip color detection function needs the detection points from the face detection.

Figure 2. Block diagram of the data transmission between different functions.

Software Development

In this part, important steps in the development of the system will be presented, including methods for implementing the expected functions of the application and the achieved milestones. The points which will be mentioned are face detection, database settings, lipstick Try-on function, Lipstick Comparison function, and lip color detection.

Face Detection

One of the most important steps in this project is recognizing the user's face and detecting the lip area. Face detection is the preparation for achieving functions like lipstick try-on functioned lip color detection function. For achieving this, the ML Kit's face detection API will be used. ML Kit is a mobile SDK that brings Google’s on-device machine learning expertise to Android and iOS apps. Its face detection API can help speed up the project process and easily implement face recognition. Most importantly, The detection points of different parts in the ML Kit can be taken out separately and easily. Moreover, there are many detection points in the lip area, so the detection results are relatively accurate.

ML Kit can detect the lip area of the face and it divides the lip area into 4 different types based on the facial points – UPPER_LIP_TOP, UPPER_LIP_BOTTOM, LOWER_LIP_TOP, LOWER_LIP_BOTTOM. The detection result is quite accurate because there are a total of 38 points assigned to the lip area, which can be seen in detail in figure 3.3  below. The more precise the algorithm, the better the result will be shown in the Lipstick Try-on function. Also, these detection points will be utilized flexibly to achieve other functions.  

In the coding part, it needs to first build and define the attribute of the detector and instantiate it in our case. If there is a face that can be detected by the detection, it will extract the lip area points and store them on the lists for further work. The lists used to store the detection points will be declared as List<PointF> to store detection point data more accurately. Because the lip area detection points in ML Kit are separated into 4 parts, it needs 4 lists to extract the lip detection points separately. In the appendix, There is also an example coding, which is the code for extracting the lip detection points located on the upper line of the top lip.

Figure 3. Facial points in ML Kit's face detection.

Database Settings

The database is needed to collect the lip image from the user. For convenience, Firebase is chosen to be the platform of the database setting. Firebase is also a platform developed by Google to create the mobile application and it provides a lot of productions that luckily embrace Ml kit. This demonstrates that face detection and database settings can be implemented together with firebase. With the Storage and Realtime Database products of firebase, the lip image and the Uri of the image will be uploaded to the Storage and Realtime database respectively once users capture the image or pick up the image from their gallery. Each uploaded data has its defined name, for example, the name of the image uploaded from the gallery is defined as file directory plus date plus. JPEG, and whether it is successfully detected by the face detector. Through Figure 3.4, it can get an overview of firebase’s Realtime Database and Storage.

Figure 4. A screenshot of database and storage.

Lipstick Try-on Function

After successfully acquiring the detection points of the lip region, the lipstick Try-on function will be implemented based on the detection points. It will use 4 types of detection points in the lip area to draw a mask over the user’s lip image to render the lipstick color. The mask drawing will use Path, Canvas, and Paint in java.

In detail, there is a new class called LipDraw to handle the lipstick color drawing activity.  Following the steps in Figure 3.5, firstly utilize the 4 types of lip area detection points to draw 4 lines so that the upper and lower bounds of each piece of the lip are constrained. The x and y position of the detection points will first be extracted, and use the function of LineTo in Path to draw the line. The other 3 types of points will also be extracted and used to draw lines.  Some coding will be executed using these 4 lines for preventing the lipstick from being applied out of bounds if the lips are open, for example, if the user is grinning in the picture, the lipstick may be applied to the teeth. In the next step, the mask will be drawn based on these 4 lines. For achieving a better applying effect, the setting of the mask is important. For example, using ANTI_ALIAS_FLAG in Paint makes the painting has sharper boundaries. The code details of setting the attribute of Paint can be found in the appendix, which defines the value of the paint and the path to create the mask. Once the mask is created, it can fill the mask with the lipstick color passed from the other function.

Figure 5. The basic flow of how to apply lipstick color to lip image.

Brand Selection Function

The lipstick Try-on function should have a lot of lipstick color options provided for the user to select. The lipstick data will be obtained from a third party. Normally, it will be packaged as JSON data, so JSON parsing is important for implementing the Brand Selection Function. There is a lipstick JSON package obtained from the internet. The JSON data includes brands, their series, and their lipstick color in different series. The API of the JSON data is needed to capture the data in the coding.

In the coding part, the API will be used to access HTTP which contains the JSON data. If the HTTP can be accessed successfully, JSON data will be extracted one by one to parse. JSON parsing needs to travel through the entire data layer and obtain information layer by layer. The actual coding part in Figure 3.6 can show the logic of the parse. Firstly, get the whole JSON data from the URL. This JSON data can be regarded as a JSONArray called “brands”.  The thing that needs to do next is to extract the JSONObjects inside JSONArray “brands” using For loop. Inside the JSONObjects, there is another JOSNArray called “Series” which is the second layer of the JSON data, so it also needs to extract the JSONObjects inside it. And then, the third layer which is the JSONArray “lipsticks” appears. Repeating the thing has been done in the second layer to continue to extract the JSON data. In short, the solution to deal with the JSON parsing is using for loop to extract the JSONObjects one by one and go deeper when finding another layer.  The parsed data will be stored in the HashMap array list in preparation for further development.

Figure 6. Flowchart of extracting JSON data.

After parsing JSON, it should bind the color data which is obtained from the JSON data to the Lipstick Try-on function. 3 different layers of logic should be considered and figure out their relationships: brand, series, and lipstick. Initially, the relationship of the extracted JSON data is only brand->series->lipstick, which is only a macro and does not deeply divide the relationship between each brand, each series, and each lipstick. Hence, the content of each brand or each series includes other brands or series contents. But the expected result is each brand or each series just includes its own content, such as brand1 just has its own series, not other brands' series shows. Therefore, it needs a model to further separate the JSON data and assign the relationship to different objects. In this model, one string will be grouped with a list which is the corresponding content of this string to change the original JSON data extracted structure. Here is an example for the explanation. This is a code line placed in the JSON parsing part: nList.add(new DataModel(List1, SeriesName));. SeriesName stores the string name of one of the series. List1 stores the lipstick data corresponding with this series. DataModel is used to bind these two data and store this data model into nList. So after the JSON parsing, nList will store all series separately with their own lipstick data.

Apart from mange the logic of JSON data, another important thing is to display these JSON data and manage the data transmission. There are 3 RecyclerViews used to display the brand, series, and lipstick data respectively. A new interface class will be created to update the series list in the brand selection interface based on the user-selected brand. An adapter listener will be set in the series's RecyclerView adapter and lipstick's RecyclerView adapter to listen to the button click item and respond to it. The adapter listener in the series's RecyclerView adapter is to transmit the lipstick name and color data to the lipstick option fragment. The adapter listener in lipstick's RecyclerView adapter is to transmit the color data to the picture display fragment. Then, the fragment will pass the data to LipDraw class mentioned in the lipstick try-on function and call the method in the LipDraw Class to draw the color on the lip image.

Lipstick Comparison Function

The comparison function can be done easily after the brand selection function and lipstick try-on function are implemented successfully. The comparison function should be implemented based on the user history of the lipstick application. In my case, there will be a new list to store the bitmap applied to the selected lipstick color when the user uses the lipstick try-on function so that the history data can be used in the comparison function easily. If the user wants to undo the option, the index of the bitmap list will be minus one, and then extract and display the bitmap based on the index. The redo function is the same as the undo function but the index of the bitmap list will be plus one. If the user wants the image before the makeup and after the makeup by another button, the index of the bitmap list jumps between 0 and the current index. The original image is stored in the index of 0.

Lip Color Detection

Lip color detection is to detect the color of the lip image uploaded from users and analyze their lip color to provide data for the subsequent recommendation system. Moreover, lip color detection can enhance the authenticity of lipstick makeup. OpenCV will be used in this part because of its versatility in image processing and ease of understanding and handling. Figure 3.7 is the diagram that shows the basic coding idea of color detection. The basic idea to achieve this function is using OpenCV to crop 2 areas from the upper lip and lower lip respectively and extract their RGB values pixel by pixel to compute the average color value of the lip image. But firstly, the width of the Rect and the height of the Rect should be defined. Besides the width and the height of the Rect, it also needs the x and the y values of the starting point. To compute the average color of the cropped lip image, the sum of the RGB value will be calculated separately. There are some equations that will be used: ,  , , where , are the sum of the R, G, B value, and R, G, B is the current pixel's R, G, B value. Then, the sum of the R, G, and B values will be divided by the number of pixels to get the average. The three averages will be integrated back into RGB format and converted the data format to string format. The coding detail is shown in the appendix.

Figure 7. The basic coding idea of color detection.

Lip Detection Point Manual Adjustment Function

Due to the time limit, This function is still needed to develop. But it already has developed more than half of the coding, so it is only briefly explained by the ideas of the parts that have been developed here. In this part, a new custom view will be created to draw the detection points with a drawable source and use the touch event to manage user touching. How to manage the touch event is the hardest part of this function. It will calculate the distance between the touch event position and the detection point. If the distance is smaller than the radius of the detection point, this detection point will be moved according to the user coordinate. The x and y coordinates after the movement need to be stored and regarded as the new detection point. Therefore, when the user back to the try-on interface, it can use the new detection point to apply the lipstick.

UI/UX

Considering the user experience of the application, there will be other small functions or display effects developed. They can be divided into 2 types: widget and feedback. For the widget, there is a liquid onboarding screen, an image slider, a search bar, and Lottie animations to beautify the UI. I imported some libraries to develop them, such as importing the Lottie library to develop Lottie animations. Another widget is the search bar in the brand selection interface, user can use it to search for the brand or series they want. There is a suggested list shown below the search bar and it can recommend the option to the user. After the search, the RecyclerView lists will scroll to the option and highlight it. To achieve this search result, it needs to find the list position of the search string and pass it to the RecyclerView adapter to set the background color. Apart from the search bar, these widgets could be easily achieved by using the functions from the imported libraries.

But for feedback, it is relatively difficult to implement. Providing timely feedback to users enables users to figure out what situation they are currently in, which is an important way to improve user experience. For example, the highlight effect was added in the brand selection function and the lipstick comparison function. It is mainly used to highlight the user-selected options or retrace the history option and highlight it. To put it simply, set the background color of the selected button or use the smoothScrollToPosition(position) function of RecyclerView when it needs to retrace the history option. However, it is not that simple in the coding part, because there are 3 layers of the option: brand, series, and lipstick, and they have a relationship with each other, it needs to do the judgment for different situations. Also, it needs to transmit the data between different classes such as the class implementing the lipstick comparison function and the lipstick RecyclerView adapter class. Take this as an example, Firstly it should know there are 2 lists involved, one is BitmapList used to store the history bitmaps, and the other one is PositionList used to store the position of the lipstick options based on the history bitmaps. The size of these two lists is the same. Following the flow in Figure 3.8. it will first obtain the history bitmap of the bitmap list, and then find the position of this bitmap in the position list.  Pass the position value to the lipstick's adapter to determine the output. If the position points to the original bitmap, there is no lipstick option to highlight. Otherwise, highlight the lipstick option the position points to.  The coding detail can be seen in the appendix.

Figure 8. Steps of achieving highlight effect in lipstick list.

Another feedback is to show some messages or give another choice to the user when the function cannot achieve the goal, such as when the face in the user image cannot be found, showing a dialog to tell the situation and ask the user whether stay in this stage or go back to select another image. Or showing the toast to remind the user when the user wants to use the search bar to search the thing application doesn't have. These can be developed simply but they are important.

Tools and Equipment

Figure 9. Logo of Android Studio

Android Studio

Android Studio is an Android integrated development tool launched by Google, based on IntelliJ IDEA. Similar to Eclipse ADT. Android Studio provides integrated Android development tools for development and debugging. It can be used on Linux, macOS, and Android platforms, and supports Java, Kotlin, Flutter, and JavaScript languages. It also provides template-based wizards to generate common Android application designs and components and a powerful layout editor allows you to drag and drop UI controls and preview the effect. The reason why I chose Android Studio is the convenience it provides.

System Evaluation
Functional Test

It is necessary to test and evaluate each function in the application system. The method to access each function is different, so it will be discussed in detail in this part. There are 5 functions needed to be evaluated, which are lipstick try-on function, brand selection function,  lip detection point manual adjustment function, lipstick comparison function, and lip color detection. Among them, the evaluation of lipstick try-on function is more complex.

Lipstick Try-on Function

The importance of the lipstick try-on function is to apply lipstick accurately to the user’s lips and minimize the influence of external environmental factors. To test whether the system can accurately apply lipstick, people who need to be found in different lip shapes and skin colors use this application and see the result. Besides, it also needs the subject to make different facial expressions like smiling, pouting, and so on to see whether the system can detect the lip and apply the lipstick correctly.

Given the influence of external factors on the application, these aspects need to be considered: shooting distance, shooting angle, skin color, and facial expression. Figure 3.10 shows some example images that have been used to test in face detection evaluation. There are also 4 groups of images. In the distance group, 4 pictures show half face, full face, upper body, and full body respectively. In the shooting angle group, the pictures show different angles including facing the camera, face down, and face right turn. In the skin color group, there are 3 men of different skin colors: white, yellow, and black. Lastly, in the face expression group, the person in the images made different facial expressions such as opening the mouth. The above sets of images are just a few examples. Evaluated the accuracy of face detection by testing a large number of photos according to these image examples.

Figure 10. 4 example image groups.

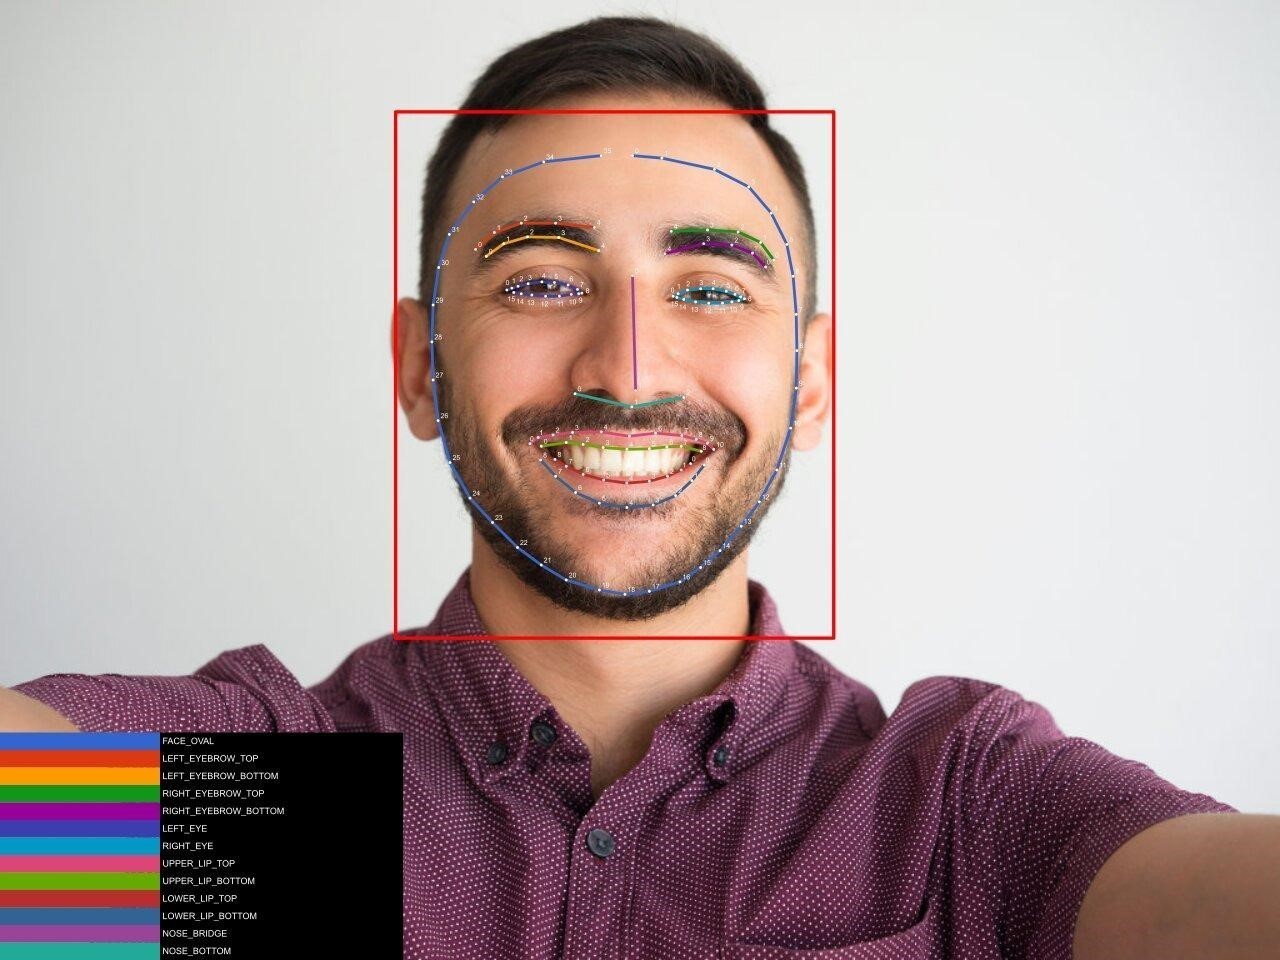
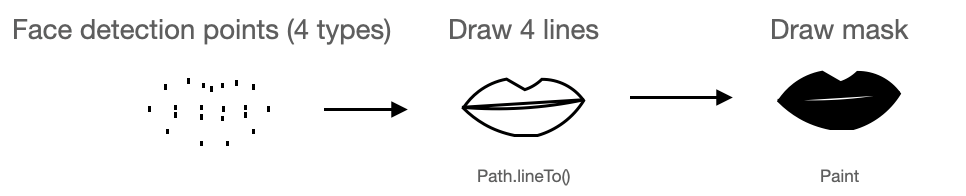
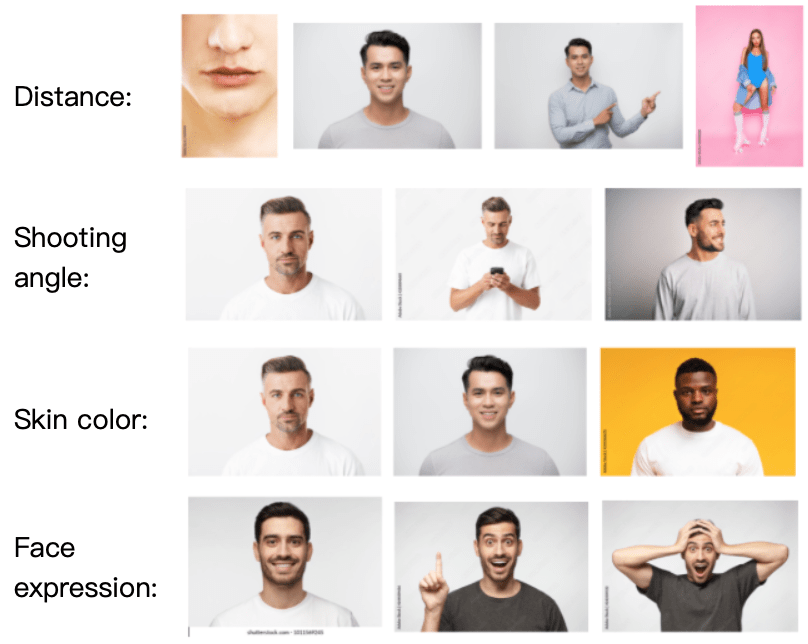
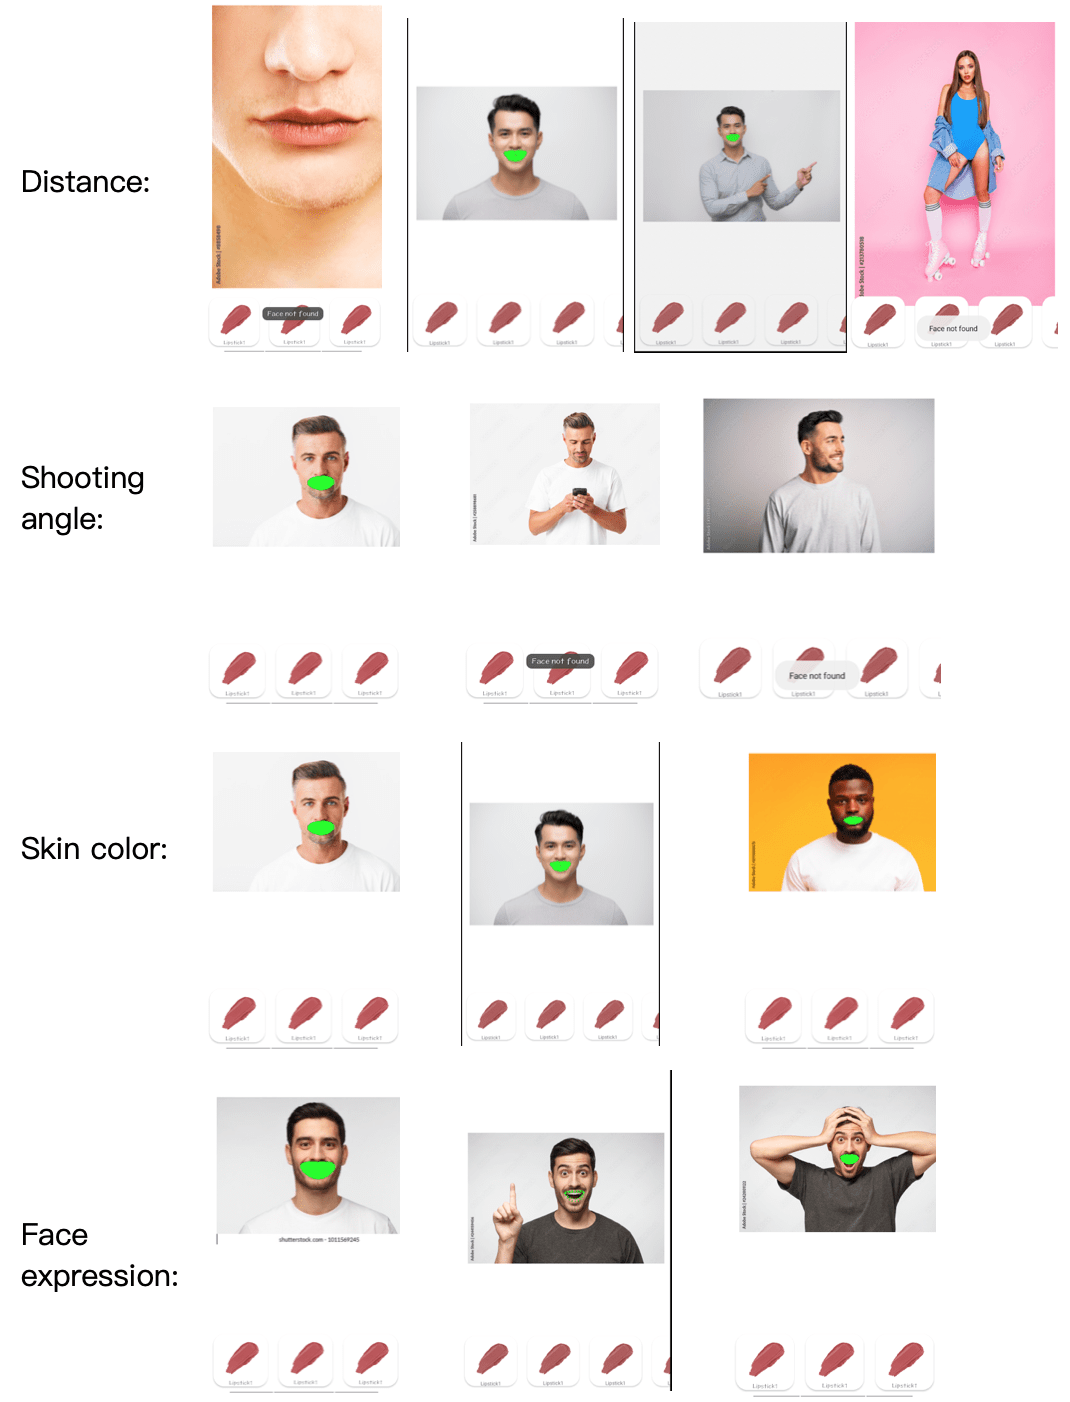
My first test was done after the face detection coding was completed. I tested around 30 images covering all 4 different factors and also the environment factor. Also, I used Canvas to draw the detection points to better show the detection results. The sample image groups are still used as an example of the results. The results are shown in figure 11. As you can see, the test results are divided into 3 different cases: face not found, face detect inaccurately, and face detect correctly. If the lip image can not be detected, there will be a text showing “face bot found” on the screen, otherwise, the detection points will be drawn on the image. By drawing these detection points, it can be judged whether the detection is correct or not.            

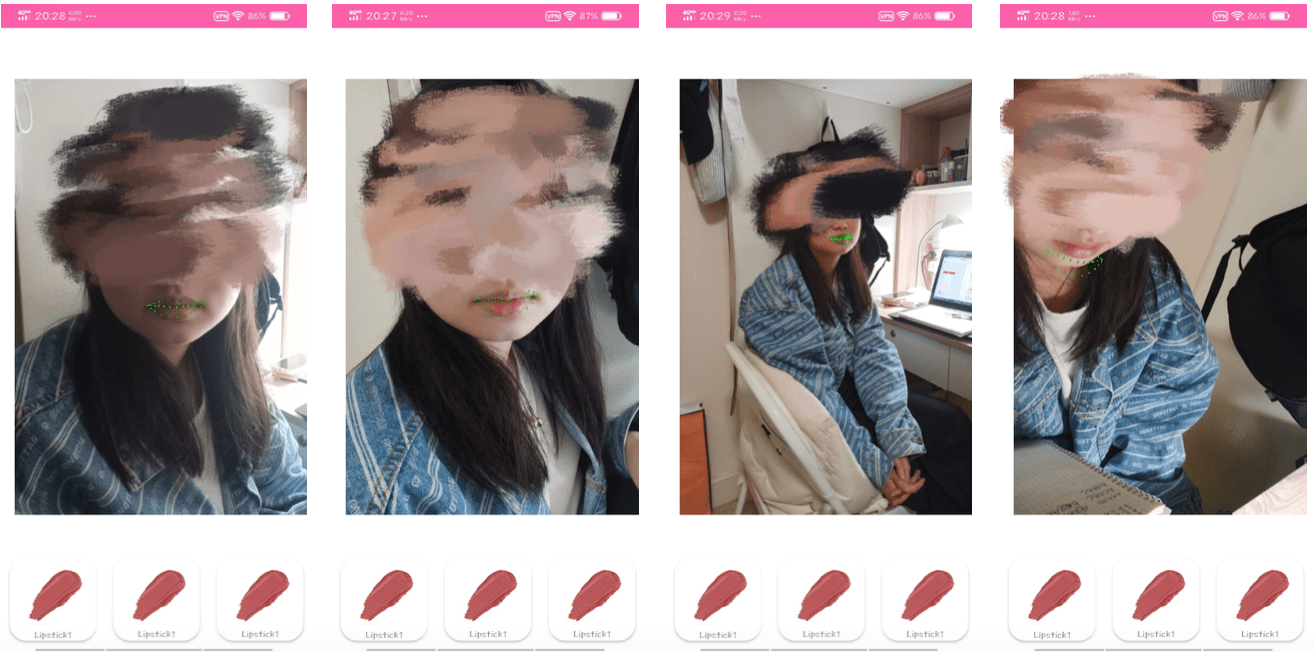
The first test was done by the emulator in the Android Studio. To be more accurate for my face detection evaluation, my second test was done with a real device. The real device I used is an Android phone, and the Android version is 9. In the real device test, I first found a photo model and photographed her at different angles, distances, and lighting. In addition, the lip image tested in the simulator was tested again in the real machine to compare the results. As an example, Figure 12. is the test result of the model case in a real device and the images are uploaded from the camera. It can be seen that face detection can work successfully in the real device and the test result is similar to the test result of the emulator. The details will be discussed in the test result section. To see and test the final output of the lipstick try-on function, it should test with the brand selection function, because the lipstick data is passed from the brand selection function.      

Brand Selection Function & Lipstick Comparison Function

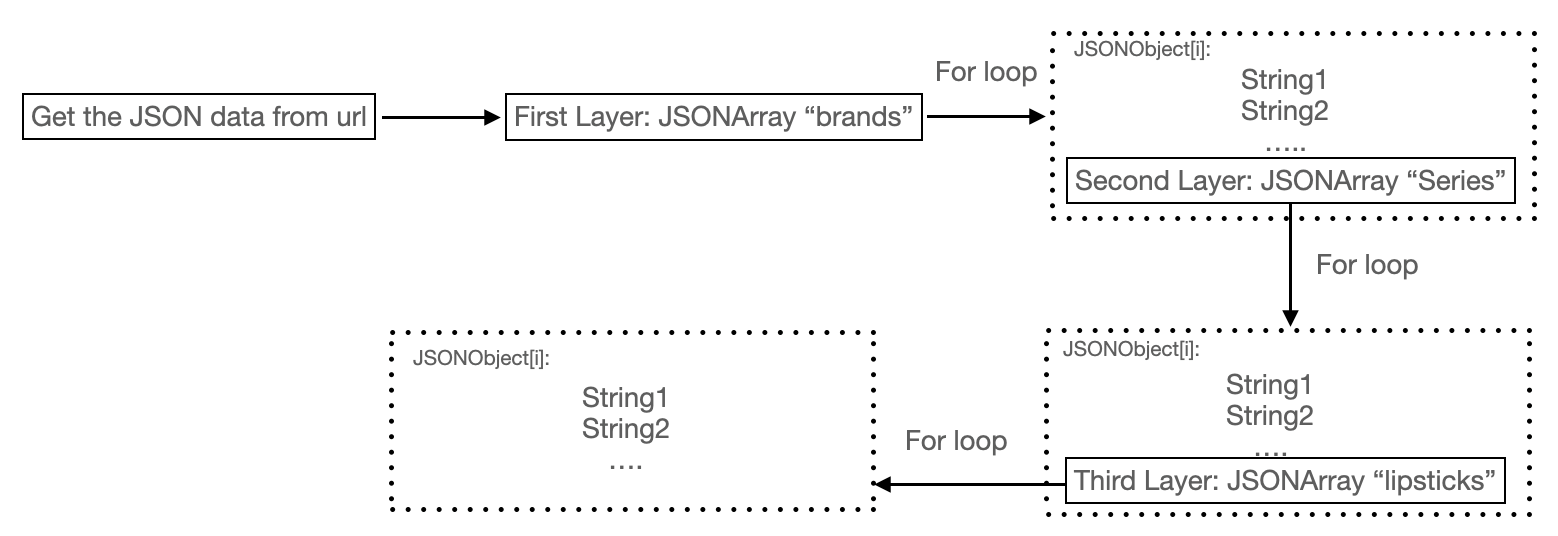
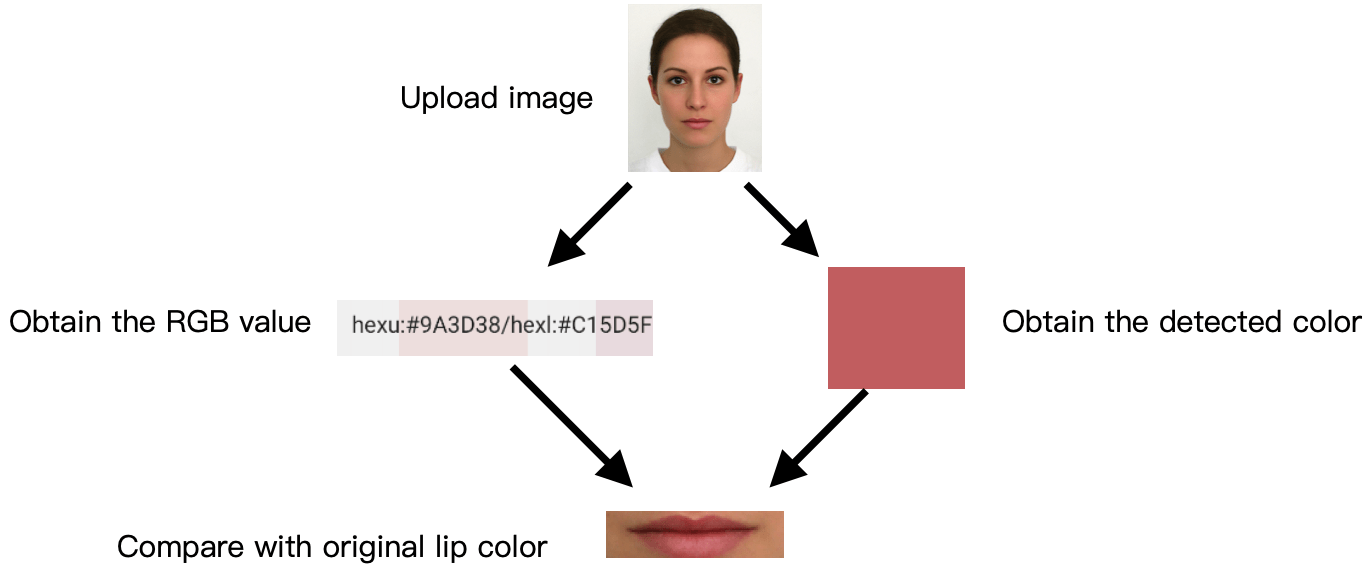
The brand selection function and lipstick comparison function were easy to be tested. Just click on the functional buttons and see the presented results. For the Brand selection function,  the test objects are brand selection, series selection, lipstick selection, and the selected option's highlight effect. Firstly, pressed the different brand buttons to see whether the series list was changed correctly. And then chose a series to see whether the interface was switched to the try-on interface and showed the correct lipstick list. Lastly, selected one of the lipsticks to see whether the color was applied to the lip image and whether the color was correct. It is also a part of the test of the lipstick try-on function. After applying the lipstick color, it could see how the try-on works, for example, whether the lipstick fits the contour of the user’s lips, and whether the try-on effect is natural. Another thing that needs to be tested is the selected option’s highlight effect. It was simply tested by pressing different buttons to see whether it is highlighted or whether it changes the highlighted option. Also, Switch the interface and come back to see whether the highlighted effect is still in the right position.

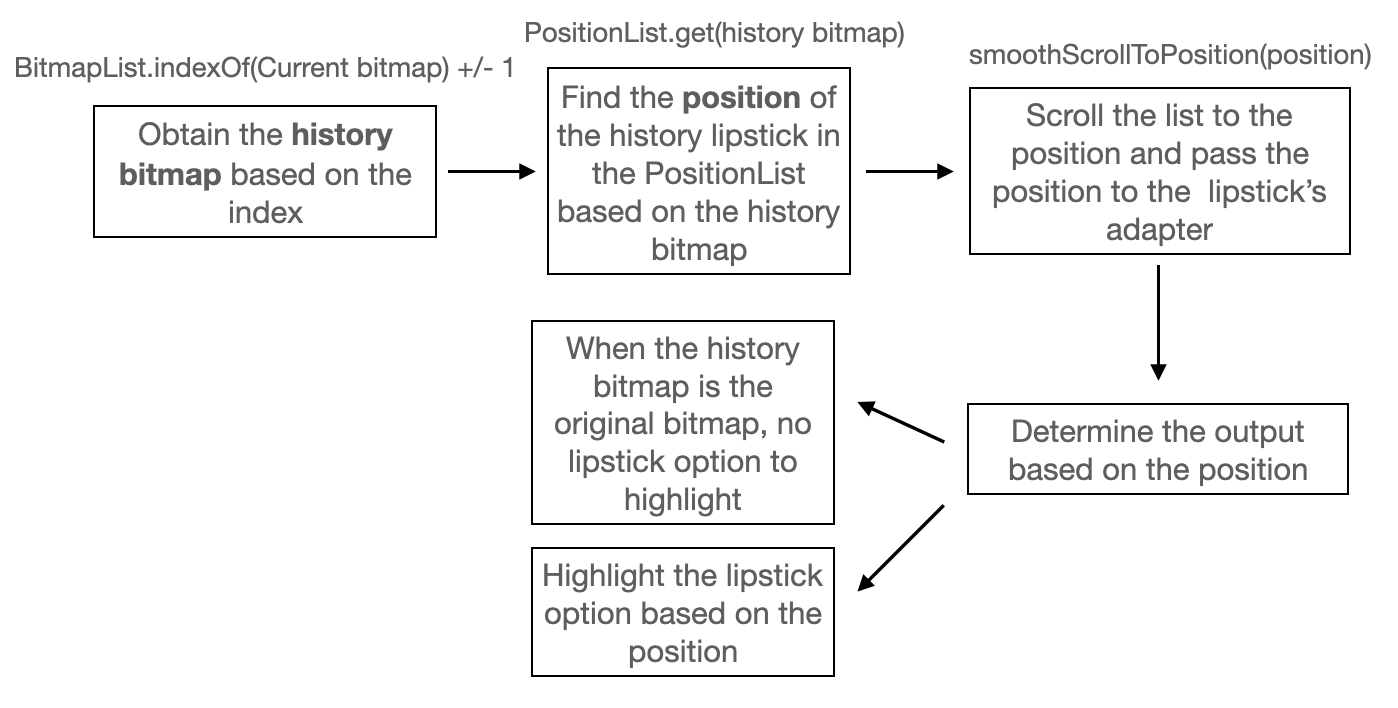
For the lipstick comparison function, its evaluation criteria mainly include whether the undo and redo function work properly, whether the lipstick list scrolls to the corresponding history option, and whether change the highlight object to the current history option when pressing the undo or redo button. Basically, after completing this part of the coding, in the subsequent development, I tested the function of brand selection and lipstick comparison every time I ran the simulator, and every run was successful without any error.

Figure 11. Test results of example image groups.

Figure 12. The test result of the model in a real device.

Lip Color Detection

The best way to evaluate color detection results is to compare them with the original color.

Hence, there is an ImageView set on the same screen with the lip image for comparison.

The RGB value that had been detected would be converted to String format for displaying the color on the screen. Meanwhile, the cropped image of the lip area used to detect color was also displayed on the screen so that errors could be better analyzed in case they occurred. The outlook of the test screen can be seen in Figure 13. The color block above is the color of the lips detected by the system. Therefore, in the test model, the detected color can be contrasted with the color of the lips on the lip image once the lip image is uploaded.

In this part of the test, a large number of lip images are still selected to continuously test the system. I still use the lip images I used in the face detection test for the lip color detection test. During the test, the RGB values of the upper lip and lower lip are also displayed except just displaying the color on the screen directly. So the main test process is to upload a picture, get the RGB values of the upper and lower lips, get the detected color, and compare the original image with the detected color of the upper and lower lips, as the figure 14. shown. Unfortunately, because the exact RGB value of the lips in the original image is not known, it cannot be compared with the detected RGB value, so it can only be judged by comparing the color.

Besides the color detection function test, the layout of the color section also is tested. Because the layout of the color detection is different from other functions. It doesn't have a particular interface or just uses a button to control. As mentioned before, there will be a dialog shown on the screen to tell the user their lip color, and this detected color will be shown as a little widget on the corner of the try-on interface with the shaking animation. Therefore, every time I tested the application I would see whether the dialog was shown with the correct lip color and whether the little widget changed its color according to the detected color.

Figure 12. The outlook of how to test the color detection.

Figure 14. The test process of the color detection.

Integrated Test

After testing each function, it is necessary to group them together to see the integrated result. The application was tested from a user's perspective to evaluate the overall performance, so the main test objects are user interface and user experience. It requires consideration of many aspects when testing the application and predicting the user actions. When switching interfaces, checked whether the switching is stuck or if there are other problems. Checked whether the functions work in order and logically, like the lipstick try-on function and lip color detection function should be done after the successful face detection, the user cannot use them before the face detection or the detection is fail. Checked whether the data transmission between different functions and different interfaces is successful and correct. Whether the application has considered all possible the user actions and gives the response to guarantee the user experience. As an example, when testing the search bar, enter the wrong name and right name respectively to see the response of the application. It should ensure the application can respond to both situations with different responses. And in order to more objectively understand the overall performance of the application, the application was tested by different people and collected their feedback to analyze the result.

Results

User Test Results

20 people used the app and had them fill out a survey. The questions for the survey can be found in the appendix. After collecting the different feedback from 20 different users, the result can be analyzed and drawn into a chart to display. Look at Figure 4.12, this is the result after asking for the feedback of these 20 users. There are 4 questions asked to the users. The first one is whether the users like the UI of the application. 3 people answered yes, 10 people are natural, and 3 people don't like the UI, so the UI of the application still needs to further improve. The second question is whether the application meets your requirement. 16 people think the application meets their requirements, while the other 4 people think it meets their basic requirements but it still needs to be further developed. The third question and the fourth question are whether you met some bugs when you used the application and whether you were confused when using the application. The answer of 20 users to both these two questions is No. It can know there is no big problem in the application, and the application gives the response to the user in time and guide them to use the application.

There is another question to ask the users whether they are satisfied with the application. 17 people said yes, and 3 people said no. one of the reasons they are not satisfied with the application is the UI cannot reach their requirements, and the other reason is the application is not multifunctional enough, it still needs more functions. Besides, there is some feedback about the layout. The layout of the application may vary on different models and brands of mobile phones. Another problem is the server that stores the lipstick JSON data is unstable. There are several users who said sometimes it took quite a long time to wait for the lipstick data, and sometimes it even failed. It should be solved in the future because there are limited resources can be used during the development phase. The lipstick JSON package this project used is one of the few resources available online.

To sum up, from the data collected from the users, it can be seen different users have their own criteria for the application. And the project application still needs to be further improved and developed.

Figure 15. Data graph of the feedback from 20 users.

Discussion

Future Work

Firstly, the lip detection point manual adjustment function should be continued to develop. And then enrich the functionality of already built functions. For example, for the lipstick try-on function, apart from the lipstick color, there will be some texture choices for users to choose such as Glossy, Satin, and Matte. The texture choices will be available after the lipstick color has been chosen. For the brand selection function, maybe there will be some relevant information shown such as the price when the user selects the lipstick color. Furthermore, there are also some new functions to be developed such as the lipstick recommendation function based on the personality data.

Conclusion

This project report has presented the milestones that have been achieved so far for the proposed mobile application design for analyzing lip images. Overall, the project has met its objectives. The application can call the camera to capture the users' lip images and also allow the users to select their lip images from the gallery. This achieves the first objective of the project. The second objective and third objective are achieved by the lipstick try-on function. The last objective is achieved by the lip color detection function. There is no big change compared with the proposal other than the difference in the project timeline. The difference in the timeline is mainly because the actual development process was different from the initial assumption like sometimes got stuck on some problem, and there are also some external factors. But fortunately, there is no big difference in the project development results and the project can finish before the deadline.

In the future, the project will continue to improve the existed functions and develop new functions. The next goal of the project is to develop a recommendation system to provide personalized service.

Jonathan Chiu
Marketing Director
3DP Technology Limited

Jonathan handles all external affairs include business development, patents write up and public relations. He is frequently interviewed by media and is considered a pioneer in 3D printing products.

Krutz Cheuk
Biomedical Engineer
Hong Kong Sanatorium & Hospital

After graduating from OUHK, Krutz obtained an M.Sc. in Engineering Management from CityU. He is now completing his second master degree, M.Sc. in Biomedical Engineering, at CUHK. Krutz has a wide range of working experience. He has been with Siemens, VTech, and PCCW.

Hugo Leung
Software and Hardware Engineer
Innovation Team Company Limited

Hugo Leung Wai-yin, who graduated from his four-year programme in 2015, won the Best Paper Award for his ‘intelligent pill-dispenser’ design at the Institute of Electrical and Electronics Engineering’s International Conference on Consumer Electronics – China 2015.

The pill-dispenser alerts patients via sound and LED flashes to pre-set dosage and time intervals. Unlike units currently on the market, Hugo’s design connects to any mobile phone globally. In explaining how it works, he said: ‘There are three layers in the portable pillbox. The lowest level is a controller with various devices which can be connected to mobile phones in remote locations. Patients are alerted by a sound alarm and flashes. Should they fail to follow their prescribed regime, data can be sent via SMS to relatives and friends for follow up.’ The pill-dispenser has four medicine slots, plus a back-up with a LED alert, topped by a 500ml water bottle. It took Hugo three months of research and coding to complete his design, but he feels it was worth all his time and effort.

Hugo’s public examination results were disappointing and he was at a loss about his future before enrolling at the OUHK, which he now realizes was a major turning point in his life. He is grateful for the OUHK’s learning environment, its industry links and the positive guidance and encouragement from his teachers. The University is now exploring the commercial potential of his design with a pharmaceutical company. He hopes that this will benefit the elderly and chronically ill, as well as the society at large.

Soon after completing his studies, Hugo joined an automation technology company as an assistant engineer. He is responsible for the design and development of automation devices. The target is to minimize human labor and increase the quality of products. He is developing products which are used in various sections, including healthcare, manufacturing and consumer electronics.

Course Code Title Credits
  COMP S321F Advanced Database and Data Warehousing 5
  COMP S333F Advanced Programming and AI Algorithms 5
  COMP S351F Software Project Management 5
  COMP S362F Concurrent and Network Programming 5
  COMP S363F Distributed Systems and Parallel Computing 5
  COMP S382F Data Mining and Analytics 5
  COMP S390F Creative Programming for Games 5
  COMP S492F Machine Learning 5
  ELEC S305F Computer Networking 5
  ELEC S348F IOT Security 5
  ELEC S371F Digital Forensics 5
  ELEC S431F Blockchain Technologies 5
  ELEC S425F Computer and Network Security 5
 Course CodeTitleCredits
 ELEC S201FBasic Electronics5
 IT S290FHuman Computer Interaction & User Experience Design5
 STAT S251FStatistical Data Analysis5
 Course CodeTitleCredits
 COMPS333FAdvanced Programming and AI Algorithms5
 COMPS362FConcurrent and Network Programming5
 COMPS363FDistributed Systems and Parallel Computing5
 COMPS380FWeb Applications: Design and Development5
 COMPS381FServer-side Technologies and Cloud Computing5
 COMPS382FData Mining and Analytics5
 COMPS390FCreative Programming for Games5
 COMPS413FApplication Design and Development for Mobile Devices5
 COMPS492FMachine Learning5
 ELECS305FComputer Networking5
 ELECS363FAdvanced Computer Design5
 ELECS425FComputer and Network Security5